In this blog, we will go over the system tasks that can be used in Verilog for a variety of purposes.
Time-consuming simulation features like @posedge and others can be found in tasks. Tasks, often known as procedures or subroutines, are used in all programming languages.
A task must be explicitly spelled out using a sentence. It cannot be utilised within an expression in the same way that a function may. Tasks may have an unlimited number of inputs and outputs.
Tasks are specified in the module where they will be used. It is possible to declare a task in a separate file and use the generated directive to instantiate the task, including the task in the file.
We go through system chores such as file output, showing hierarchy, strobing, random number generation, memory initialization, and value change dump.
Display/Write Task
To write to files, the system tasks $fdisplay, $fmonitor, $fwrite, and $fstrobe are needed. These activities use the same syntax as standard system tasks like $display, $monitor, and so on, but they also have the ability to write to files.
Only $fdisplay and $fmonitor tasks will be considered.
Usage: $fdisplay(<file_descriptor>, p1, p2 ….., pn);
$fdisplay(<file_descriptor>, p1, p2 ….., pn);
Variables, signal names, or quoted strings can all be used.
A file descriptor is a multichannel descriptor that can be a single file handle or a bitwise combination of several file handles. In that case, Verilog will write the output to all files that have a 1 in their file descriptor.
Any level of hierarchy can be displayed by using the %m option in any of the display jobs, $display, $write, $monitor, or $strobe. This is a really handy option.
When many instances of a module run the identical Verilog code, for example, the %m option distinguishes which model instance the output is coming from. The %m option in the display tasks requires no arguments.
$display and $write both display arguments in the order they occur in the argument list.
$write(<list_of_arguements>);
$write does not attach the newline character to the end of its string, although $display does, as illustrated in the sample below.
Let’s have a simple example to understand it better.
module tb;
  initial begin
    $display ("this ends the line ");
    $write ("This does not end the line,");
    $write ("To start new line, use newline char");
  end
endmodule

Fig 1: Output of Display/Write Task
From Figure 1, which shows the output of the above example, we can easily understand the basics related to it.
Stop Task
To pause simulation, use the $stop system task. When called, it suspends the simulation, prints the simulation time, and prints the location.
Optional expressions can be used to specify the type of printed message:
| Expression | Message |
| 0 | No message |
| 1 | Simulation time and location |
| 2 | Simulation time, location, memory consumption and CPU time used in simulation. |
The number 1 is used by default.
$stop ;
It Suspend simulation and print message (default argument = 1).
Finish Task
The $finish system task leaves the simulator and returns control to the operating system at the end of the simulation.
It uses the same default value as the $stop system job and can be run with the same parameters.
#150 $finish(2) ;
The simulator exits the simulator after 150 time units from the previous command executed and outputs the message (argument == 2).
Remember that the $finish control system job terminates the simulator, whereas $stop just suspends it.
Random Task
A random set of test vectors requires the ability to generate random numbers. Random testing is vital because it frequently uncovers hidden flaws in the design.
Random vector creation is also utilised in chip architectural performance studies. $random is a system job that generates a random number.
Usage: $random;
$random(<seed>);
The <seed> value is optional and is used to ensure that the same random number sequence is used each time the test is run. The random job generates a 32-bit random number.
Let’s go through an example to understand random tasks more clearly.
module Tb();
integer address;

initial
begin
repeat(5)
#1 address = $random;
end

initial
$monitor("address = %d;",address);

endmodule
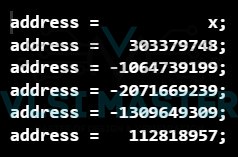
In Figure 2, it shows the output of the following example of a random task.

Fig 2: Output of Random Task
Example:
Although all $display, $monitor, $write, and $strobe functions in System Verilog appear to be the same, there is a slight difference.
$display is the standard display that runs on its parameters wherever it appears in the code.
$display, like $write, shows the contents of the next line (the cursor moves to the next line before displaying), whereas $write shows the contents of the current line.
$strobe is only executed once in a time instant after all processes in that instant have completed.
$monitor only runs if any of its parameters change (in one instant). It will be clear if we explain this with an example.
module d11;
bit a=0,b=0;
initial begin
a=0; b=1;
$display(a,b);
$strobe(a,b);
b=0; a=1;
$display(a,b);
$write(a,b);
$display(a,b);
#1 b=1;
end
initial
$monitor($time,&quot;ns: &quot;,a,b);
endmodule
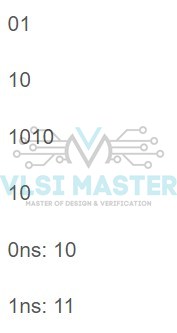
The output of the above example is shown below in figure 3.

Fig 3 Various task example
Hence, from the above example, we can easily differentiate between various tasks that are used in Verilog.
Hence, we studied and learned about various tasks used in Verilog.
Let’s summaries the whole blog in a few questions.
- What exactly is a task in Verilog?
- What exactly do you mean by “Display/Write Task”, and how do you utilize it?
- What is the difference between a stop and a finish task?
- What is a random task, and how can it be used?

