In the previous blog, Procedural Assignments, we looked at procedural assignments. So let’s start a new blog with more details about the study about procedural continuous assignment.
Previously, we learned that a register is assigned a value via procedural assignments. The value remains in the register until another procedural assignment assigns another value to it.
whereas in continuous procedural assignments, reactions are different. They are procedural statements that allow expression values to be constantly pushed into registers or nets for brief periods of time.
Existing assignments to a register or net are overridden by procedural continuous assignments. They are a valuable addition to the standard procedural assignment statement.
assign and deassign
The first form of procedural continuous assignment is expressed by the terms assign and deassign.
Only a register or a concatenation of registers can be used on the left side of procedural continuous assignments. It cannot be a net or register array component or bit select.
The impact of regular procedural assignments is overridden by procedural continuous assignments. Procedural continuous assignments are typically used for timed intervals.
A simple example is shown below by using assign and deassign statements.
reg q;

initial begin
    assign q  = 0;
    #20 deassign q;
end
We overrode the assignment on q in the preceding example and applied new values to it. After the deassign, the register variables keep the continually given value until they are altered by a subsequent procedural assignment.
force and release
To represent the second version of procedural continuous assignments, the keywords force and release are used. They can be used to overrule register and net assignments.
Force and release statements are commonly used in interactive debugging to force some registers or nets to a value while noting the effect on other registers and nets. It is not advised to utilise force and release statements within design blocks.
They should only exist in stimuli or as debug statements.
force and release on registers
Any procedural assignments or procedural continuous assignments on a register are overridden by force until the register is released.
After being released, the register variables will retain the forced value, which may then be altered by a subsequent procedural assignment.
We may use the following to temporarily override the values of “o” in below example.
reg o,a,b;

initial begin
    force o = a & b;
    …
    release o;
end
force and release on nets
Any ongoing assignments on nets are overridden until the net is freed. When the net is released, it quickly returns to its regular drive value.
A net can be made to represent an expression or a value.
module top;
…
…
assign out = a & b & c;
…
initial
    #50 force out = a| b & c;
    #50 release out;
end
…
…
endmodule
In the preceding example, a new phrase is pushed onto the net between times 50 and 100. When the force statement is active from time 50 to time 100, the phrase a | b & c is revalued and assigned to out anytime the values of signals a, b, or c change.
Thus, the force statement operates similarly to a continuous assignment, except that it is only active for a short duration.
Let’s look at a good example, and don’t worry about the not understanding part because it will be clarified in a later blog; instead, concentrate on how the assign statement works.
4-Bit Carry Lookahead Adder in Verilog
It is worth noting that the carry lookahead adder output (o result) is one bit larger than both adder inputs. This is due to the fact that two N bit vectors added together can yield a result of N+1 size. For instance, b”11″ + b”11″ = b”110″. 3 + 3 = 6 in decimal.
`include "full_adder.v"

module carry_lookahead_adder_4_bit
  (
   input [3:0]  i_add1,
   input [3:0]  i_add2,
   output [4:0] o_result
   );

  wire [4:0]    w_C;
  wire [3:0]    w_G, w_P, w_SUM;

  full_adder full_adder_bit_0
    (
      .i_bit1(i_add1[0]),
      .i_bit2(i_add2[0]),
      .i_carry(w_C[0]),
      .o_sum(w_SUM[0]),
      .o_carry()
      );

  full_adder full_adder_bit_1
    (
      .i_bit1(i_add1[1]),
      .i_bit2(i_add2[1]),
      .i_carry(w_C[1]),
      .o_sum(w_SUM[1]),
      .o_carry()
      );

  full_adder full_adder_bit_2
    (
      .i_bit1(i_add1[2]),
      .i_bit2(i_add2[2]),
      .i_carry(w_C[2]),
      .o_sum(w_SUM[2]),
      .o_carry()
      );

  full_adder full_adder_bit_3
    (
      .i_bit1(i_add1[3]),
      .i_bit2(i_add2[3]),
      .i_carry(w_C[3]),
      .o_sum(w_SUM[3]),
      .o_carry()
      );

  // Create the Generate (G) Terms:  Gi=Ai*Bi
  assign w_G[0] = i_add1[0] & i_add2[0];
  assign w_G[1] = i_add1[1] & i_add2[1];
  assign w_G[2] = i_add1[2] & i_add2[2];
  assign w_G[3] = i_add1[3] & i_add2[3];

  // Create the Propagate Terms: Pi=Ai+Bi
  assign w_P[0] = i_add1[0] | i_add2[0];
  assign w_P[1] = i_add1[1] | i_add2[1];
  assign w_P[2] = i_add1[2] | i_add2[2];
  assign w_P[3] = i_add1[3] | i_add2[3];

  // Create the Carry Terms:
  assign w_C[0] = 1'b0; // no carry input
  assign w_C[1] = w_G[0] | (w_P[0] & w_C[0]);
  assign w_C[2] = w_G[1] | (w_P[1] & w_C[1]);
  assign w_C[3] = w_G[2] | (w_P[2] & w_C[2]);
  assign w_C[4] = w_G[3] | (w_P[3] & w_C[3]);

  assign o_result = {w_C[4], w_SUM};   // Verilog Concatenation

endmodule // carry_lookahead_adder_4_bit
The carry lookahead adder described above makes use of a Verilog parameter to allow for different implementations of the same code. This increases the code’s versatility and reusability.
Using the parameter, the code generates a generate statement that instantiates as many full-adders as the WIDTH parameter specifies.
This code demonstrates the power of parameters and generate statements in creating code that is compact but highly malleable.
It can be used for inputs of any width. Simply set the width appropriately for his or her specific application, and the tools will generate the appropriate amount of logic.
`include "full_adder.v"

module carry_lookahead_adder
  #(parameter WIDTH)
  (
   input [WIDTH-1:0] i_add1,
   input [WIDTH-1:0] i_add2,
   output [WIDTH:0]  o_result
   );

  wire [WIDTH:0]     w_C;
  wire [WIDTH-1:0]   w_G, w_P, w_SUM;

  // Create the Full Adders
  genvar             ii;
  generate
    for (ii=0; ii<WIDTH; ii=ii+1)
      begin
        full_adder full_adder_inst
            (
              .i_bit1(i_add1[ii]),
              .i_bit2(i_add2[ii]),
              .i_carry(w_C[ii]),
              .o_sum(w_SUM[ii]),
              .o_carry()
              );
      end
  endgenerate

  // Create the Generate (G) Terms:  Gi=Ai*Bi
  // Create the Propagate Terms: Pi=Ai+Bi
  // Create the Carry Terms:
  genvar             jj;
  generate
    for (jj=0; jj<WIDTH; jj=jj+1)
      begin
        assign w_G[jj]   = i_add1[jj] & i_add2[jj];
        assign w_P[jj]   = i_add1[jj] | i_add2[jj];
        assign w_C[jj+1] = w_G[jj] | (w_P[jj] & w_C[jj]);
      end
  endgenerate

  assign w_C[0] = 1'b0; // no carry input on first adder

  assign o_result = {w_C[WIDTH], w_SUM};   // Verilog Concatenation

endmodule // carry_lookahead_adder
Testbench:
`include "carry_lookahead_adder.v"

module carry_lookahead_adder_tb ();

  parameter WIDTH = 3;

  reg [WIDTH-1:0] r_ADD_1 = 0;
  reg [WIDTH-1:0] r_ADD_2 = 0;
  wire [WIDTH:0]  w_RESULT;

  carry_lookahead_adder #(.WIDTH(WIDTH)) carry_lookahead_inst
    (
     .i_add1(r_ADD_1),
     .i_add2(r_ADD_2),
     .o_result(w_RESULT)
     );

  initial
    begin
      #10;
      r_ADD_1 = 3'b000;
      r_ADD_2 = 3'b001;
      #10;
      r_ADD_1 = 3'b010;
      r_ADD_2 = 3'b010;
      #10;
      r_ADD_1 = 3'b101;
      r_ADD_2 = 3'b110;
      #10;
      r_ADD_1 = 3'b111;
      r_ADD_2 = 3'b111;
      #10;
    end

endmodule // carry_lookahead_adder_tb
The waveform of the above example is shown in the below figure 1.
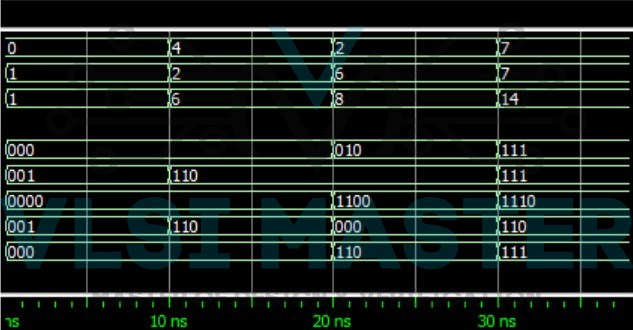
Fig 1 4-Bit Carry Lookahead Adder waveform
As a result of reading this blog, we now have a better understanding of procedural continuous assignment.
So let’s summarise the whole blog with a few questions that will make the blog more interesting.
- What do you mean by “procedural continuous assignment”?
- How many types of procedural continuous assignment are there?
- How to use “assign” and “deassign” assignments?
- What is force and release assignment?
- How are force and release assignments used on registers?
- How are force and release assignments used on nets?