In today’s blog we will study loops that are used in computer programming also, and which we already know about, and almost all the functions are the same, just the syntax will be a little different in Verilog. So let’s check that
In Verilog, looping statements are classified into four types: while, for, repeat, and forever. Only initial or always blocks can include looping statements. Delay expressions can be used in loops.
While Loop
This loop is specified with the keyword while. The while loop runs until the while-expression is false. When the loop is entered when the while-expression is false, the loop is not performed.
These operators can be used to specify any logical expression. If numerous statements are to be run in a loop, they must be separated by the keywords begin and end. The while loop is seen in the example below.
//Increment count from 0 to 255 and exit at count 256.
integer count;
initial
begin
count = 0;
while (count < 256) //exit at count 256
begin
$display("Count = %d", count);
count = count + 1;
end
end
For loops are commonly employed when the loop has a definite beginning and finish.
If the loop is merely looping on a condition, the while loop is preferable.
Let’s see another example of a while loop with output so that its concept will be clearer.
module while_example();

   reg [5:0] loc;
   reg [7:0] data;

   always @ (data or loc)
   begin
     loc = 0;
     // If Data is 0, then loc is 32 (invalid value)
    if (data == 0) begin
      loc = 32;
    end else begin
      while (data[0] == 0) begin
        loc = loc + 1;
        data = data >> 1;
      end
    end
    $display ("DATA = %b   LOCATION = %d",data,loc);
  end

  initial begin
     #1  data = 8'b11;
     #1  data = 8'b100;
     #1  data = 8'b1000;
     #1  data = 8'b1000_0000;
     #1  data = 8'b0;
     #1  $finish;
 end

  endmodule
The output of the above example is shown below as programmed.
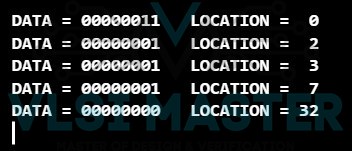
Fig 1: While Loop Output
For Loop
The loop is specified with the keyword for. The loop is divided into three sections:
- a starting point
- a test to determine whether the termination condition is true
- a procedural assignment to modify the control variable’s value
The for loop includes the initialization condition and the incrementing procedural assignment, so they do not need to be given individually. As a result, the for loop has a more compact loop structure than the while loop.
However, the while loop is more broad in nature than the for loop. The for loop cannot be used instead of the while loop in several cases.
The counter in the above example may be written as a for loop, as shown below.
integer count;

initial
    for ( count=0; count <256; count = count + 1)
        $display(“count = %d”, count);
Let’s look at an example using Verilog.
module for_example();

   integer i;
   reg [7:0] ram [0:255];

   initial begin
     for (i = 0; i < 256; i = i + 1) begin
        #1  $display(" Address = %g  Data = %h",i,ram[i]);
       ram[i] <= 0; // Initialize the RAM with 0
       #1  $display(" Address = %g  Data = %h",i,ram[i]);
    end
     #1  $finish;
  end

  endmodule
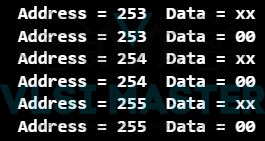
Fig 2: For loop Output
We will not be able to show the whole output as it would be very long, but you can run the code if you want to see the example properly.
As the output shows, it shows that it counts till 255 as programmed.
Repeat Loop
This loop uses the keyword repeat. The repeat construct runs the loop a certain number of times.
A repeat construct cannot be used to loop over a logical expression in general. A while loop is used to do this.
A number, which might be a constant, a variable, or a signal value, must be included in a repeat construct. If the number is a variable or signal value, it is evaluated just when the loop begins, not throughout loop execution.
The example that is shown above may be stated using the repeat loop, as illustrated in the below example.
//count from 0 to 255 using repeat loop
integer count;

initial
begin
    count = 0;
    repeat(256)
    begin
        $display(“ count = %d”,count);
        count =count +1;
    end
end
Let us explain with another example so that it is easier to grasp.
module repeat_example();
   reg  [3:0] opcode;
   reg  [15:0] data;
   reg        temp;

   always @ (opcode or data)
   begin
     if (opcode == 10) begin
       // Perform rotate
      repeat (8) begin
         #1  temp = data[15];
        data = data << 1;
        data[0] = temp;
      end
    end
  end
  // Simple test code
  initial begin
     $display (" TEMP  DATA");
     $monitor (" %b     %b ",temp, data);
      #1  data = 18'hF0;
      #1  opcode = 10;
      #10  opcode = 0;
      #1  $finish;
  end

  endmodule
The output of the above code is shown below :
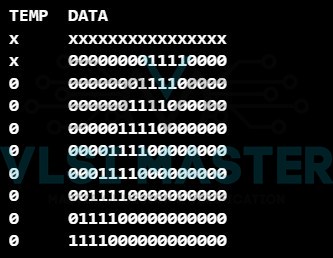
Fig 3: Repeat Loop Output
Forever Loop
This loop is expressed with the term forever. The loop has no expressions and runs indefinitely until the $finish task is encountered.
The loop is equal to a while loop with a true-or-false statement, such as while (1). The disable statement can be used to end an eternal loop.
In most cases, a forever loop is used in combination with temporal control components. Without the usage of timing control techniques, the Verilog simulator would execute this statement indefinitely without advancing simulation time, and the rest of the design would never be executed.
As we saw in our earlier piece on verilog test benches, one of the most popular use cases for the forever loop in a verilog test programme is creating a clock signal.
Below example demonstrates how to utilise the forever statement.
//clock generation with forever loop
module forever_example ();

reg clk;

initial
begin
      #1  clk = 0;
     forever begin
        #5  clk =  ! clk;
     end
  end

  initial begin
    $monitor ("Time = %d  clk = %b",$time, clk);
     #100  $finish;
  end

  endmodule
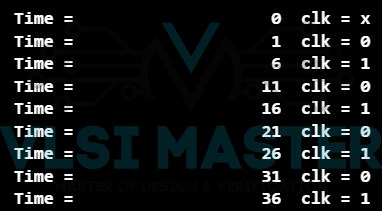
Fig 4: Forever loop Output
To begin, keep in mind that we are using the Verilog beginning block, which is another example of a procedural statement.
Any code we write in an initial block is only run once at the start of a simulation.
Hence, we can see the output of the above example as the time-increment clock runs periodically.
So we studied the various types of blogs that we use in Verilog.
Let’s have some questions for you to summarise the whole blog
- What do you mean by loops?
- What are the types of loops in Verilog?
- What is the difference between a while and a for loop, and can you explain it with examples?
- How do you use repeat loop?
- What do you mean by “forever loop”?